


For many people, the thought of yoga conjures up images of flexible superhumans contorting their bodies into impossible shapes. However, yoga is actually a great way for beginners to get started on a fitness journey.
The practice of yoga is said to date back over 5,000 years. It originated in India and has since spread to countries all over the world. Asanas, or yoga poses, are often the first thing people think of when they hear the word yoga. And while it’s true that asanas are an important part of the practice, they are just one piece of the puzzle.
In order to truly benefit from yoga, it is important to understand all eight of the limbs. Asanas are just one of the eight limbs, and they are intended to prepare the body for meditation. The other seven limbs are: Yama (restraints), niyama (observances), pranayama (breath control), pratyahara (sense withdrawal), dharana (concentration), dhyana (meditation), and samadhi (absorption).
Today, yoga is practiced by people of all ages and backgrounds, and its popularity shows no signs of waning. For beginners, yoga can seem like a daunting proposition. But it is an excellent way to improve flexibility, balance, and strength. In addition, yoga is a great way to reduce stress and relax the mind.
When it comes to choosing a workout routine, there are countless options available. However, not all exercises are created equal. For example, some yoga poses are low impact while others are more intense. However, the best part is that all you need is a yoga mat to get going.
Whether you’re a beginner or a seasoned pro, there’s a yoga pose for everyone. From the basic sun salutation to more advanced poses like arm balances and inversions, there’s something for everyone in yoga. And while some poses may seem impossible at first, with a little practice, anything is possible. So, what are you waiting for? Get on your mat and start practicing with us!
In this article, we are going to discuss 40 yoga exercises that can help change your life by adding peace, balance, wellness, and fitness to it.
1. Warrior I (Virabhadrasana I)
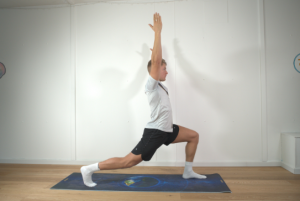

There’s nothing quite like the feeling of stretching your muscles and reaching for the sky. And when it comes to yoga, there’s no pose more empowering than warrior I. Named for its resemblance to a fighter poised for battle, warrior I is a powerful and grounding pose that offers a wide range of benefits. This pose strengthens the legs and improves balance.
- To enter the pose, begin in mountain pose with your feet together and your hands at your sides.
- Step your left foot back and place it flat on the ground.
- Turn your left foot so that it is parallel to the back edge of your mat, then pivot your right foot so that it is pointing straight ahead.
- Bend your right knee and lower your hips until your thigh is parallel to the ground.
- As you exhale, raise your arms above your head and press your palms together.
- Gaze up at your hands and hold the pose for five to eight breaths.
- To exit the pose, exhale as you lower your arms and release your right leg back into mountain pose.
- Repeat on the other side.
2. Warrior II (Virabhadrasana II)
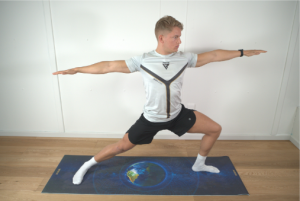

Warrior II is one of the most popular yoga poses, and it’s no wonder why. Not only does it look impressive, but it also has a number of benefits for your body and mind.
When done correctly, Warrior II can help to stretch your hips, thighs, and ankles. It can also strengthen your legs and improve your balance. Additionally, the pose can help to improve your concentration and increase your energy levels. So, whether you’re looking to build strength or simply want to enjoy a peaceful moment of mindfulness, Warrior II is the perfect pose for you.
- To do Warrior II, start by standing with your feet together.
- Then, Step your right foot back and turn your left foot’s toes out to the side.
- Bend your left knee so that it’s directly over your left ankle.
- Reach your arms out to the sides, and then gaze over your left hand.
- Hold the pose for a few deep breaths, and then repeat on the other side.
3. Side Angle (Utthita Parsvakonasana)
 RDX Sports")

Extended Side Angle is an excellent yoga pose for improving balance and flexibility. It also strengthens the muscles of the thighs, knees, and ankles. This pose can help to prevent injuries, such as strains and sprains. In addition, Extended Side Angle helps to improve digestion and can be therapeutic for people with back pain.
- First, begin in Warrior II by stepping your left foot back about four feet, then turning your left heel, so it’s pointing directly out to the side.
- Next, bend your right knee, so it’s lined up directly over your right ankle, and reach your arms out to the sides so they’re parallel to the ground.
- Once you’re in this position, exhale as you lean your torso forward and place your right elbow on top of your right thigh.
- Reach your left arm straight up toward the ceiling, then turn your head to look up at your left hand.
- Hold this position for five deep breaths before returning to Warrior II and repeating on the other side.
4. Triangle Pose (Utthita Trikonasana)
 RDX Sports")

Triangle pose is one of the most popular yoga poses, and for a good reason. It stretches the muscles along the sides of the body, including the obliques, shoulders, and hips. It also strengthens the legs and helps to improve balance.
For beginners, Triangle pose can be a challenge, but there are many benefits to be gained from practicing this pose. With regular practice, you will notice an improvement in your flexibility and balance. You may also find that your posture improves and that you have more energy throughout the day.
- To do the Triangle Pose, stand with your feet about three feet apart.
- Turn your right foot out 90 degrees and your left foot in slightly.
- As you exhale, reach your right hand down to your right ankle and your left hand up to the ceiling.
- Then, as you inhale, extend your torso to the right.
- Hold the pose for several breaths before repeating it on the other side.
Related Article: Yoga for the Ages!
5. Forward Bend (Uttanasana)
 RDX Sports")

One of the most basic yoga poses, Uttanasana (Forward Bend) is a great way to stretch the hamstrings and lower back. Uttanasana is a great way to release tension from the back and legs, and it can be used as a preparation for more advanced yoga poses. Here’s how to do it:
- Start standing with your feet about hip-width apart.
- Fold forward at the hips, keeping your back flat.
- If you can, place your palms on the ground next to your feet. If you can’t reach the ground, place your hands on your shins or grab your elbows with opposite hands.
- Hold the pose for a few breaths, then slowly come back up to standing.
6. Reverse Warrior (Viparita Virabhadrasana)
 RDX Sports")

Reverse Warrior is a powerful Yoga pose that stretches the entire front of the body while strengthening the back and legs. It’s also an excellent opportunity to check in with your Warrior energy and see if it’s in alignment with your life purpose. Here’s how to do it:
- Begin in Warrior II. Step your left foot back about 4 feet, keeping your heels in line with each other. Reach your arms out to the sides, parallel to the ground.
- Turn your head to look over your left hand. Bend your left knee and lean your torso back over your straight right leg, reaching your left hand toward the sky. Keep your shoulders down and away from your ears. Hold for 5-8 breaths.
- To release, press into your right heel to bring yourself back up to Warrior II. Repeat on the other side.
Related Article: Top Benefits of Online Yoga
7. Garland Pose (Malasana)
 RDX Sports")

Though it may not look like much, the Garland Pose (Malasana) is a powerful tool for improving flexibility and strengthening the core. The pose opens up the hips and groin, while also stretching the back and shoulders. In addition, the Garland Pose helps to increase circulation and stimulate the digestive system.
For those looking to improve their practice, the Garland Pose is an essential pose. Not only does it prepare the body for more advanced asanas, but it also helps to build strength and stamina. And for those who are simply looking to relax, the Garland Pose is a perfect way to unwind after a long day.
- To begin, stand with your feet about hip-width apart.
- Bend your knees and lower your hips to the floor to get into a squat, keeping your weight evenly distributed between your heels and your toes.
- Place your hands in front of your chest in Namaste mudra, or prayer position inside your knees.
- Continue to press your upper arms into your thighs and keep your upper arms engaged.
- Continue to move through this motion for several breaths, then come out of the pose on an exhale.
8. Half Forward Bend (Ardha Uttanasana)
 RDX Sports")

Half Forward Bend (Ardha Uttanasana) is a standing yoga pose that stretches the hamstrings, back, and shoulders. It also calms the mind and reduces stress.
- To do the pose, start in Mountain Pose (Tadasana) with your feet hip-width apart and your hands at your sides. As you inhale, raise your arms overhead.
- Then, as you exhale, bend forward from the hips, letting your arms fall beside your head. Keep your knees soft as you fold forward.
- If you can’t reach the floor with your hands, place them on a block or chair.
- Hold the pose for several deep breaths before slowly rising back to Mountain Pose.
- Half Forward Bend is a great way to release tension from the back and shoulders.
- It’s also a helpful pose if you’re feeling fatigued or stressed. Give it a try the next time you need a little boost of energy!
9. Mountain Pose (Tadasana)
 RDX Sports")
Tadasana is often referred to as Mountain Pose, and it is a good starting position for many other yoga poses. The key to doing this pose correctly is to keep your body in a straight line from your head to your heels.
Tadasana is an excellent pose for beginners, as it helps to build awareness of proper alignment in the body. By practicing this pose regularly, you’ll develop the ability to carry good posture and alignment into all of the other poses in your yoga practice. Here’s how to do it:
- Begin by standing with your feet hip-width apart. Root down through your feet and lift up through your crown. Draw your shoulder blades down and back, and open your chest.
- Extend your arms overhead, keeping them parallel to each other. Gaze up at your thumbs and lengthen the sides of your neck. As you exhale, fold forward from the hips, engage your core muscles and keep your spine long.
- When you reach your fullest forward bend, place your palms on the floor (or on blocks if you can’t touch the ground) and press back up to the mountain pose. Finish by inhaling all the way back up to standing tall.
Related Article: Home Gym Setup and Essentials
10. Downward Facing Dog (Adho Mukha Shvanasana)
 RDX Sports")

This is a great pose for beginners because it can be modified to suit your level of flexibility. It’s an excellent way to stretch, improve flexibility and increase your range of motion. Just remember to keep pressing through the palms of your hands and relax into the stretch. You’ll be downward dogging in no time.
- Start on all fours with your hands and knees shoulder-width apart.
- Spread your fingers wide and press firmly through your palms as you lift your hips and straighten your legs, coming into an inverted “V” shape.
- Keep your feet hip-width apart as you lengthen your spine.
- Relax your head between your arms and direct your gaze toward your belly button.
- Press back through your heels to deepen the stretch, elongating your hamstrings. And don’t forget to breathe!
11. Pyramid Pose (Parsvottanasana)
 RDX Sports")

If you’re looking for a way to add a little drama to your yoga practice, look no further than the pyramid pose. This powerful posture requires both strength and flexibility, making it the perfect challenge for intermediate yogis. Here’s how to do it:
- Start with the downward-facing dog.
- From there, bring your right foot forward to the inside of your right hand. Come up to your fingertips, then step your left foot forward about a foot.
- Turn your left foot toes out slightly and lower your left heel so that the sole of your foot is flat on the mat, then straighten your right leg.
- Now it’s time to lift your torso to a standing position. Put both hands on your hips to make sure that your hip points are facing toward the front of the mat.
- Inhale to lengthen the spine, then deepen your right hip crease on the next exhale as you come into a forward bend over your right leg.
- Keep a flat back as you lower yourself. When you come to your full extension, hold the position for 5 breaths.
12. Raised Hands (Urdhva Hastasana)
 RDX Sports")

The raised hands yoga Pose is a great way to reduce stress and tension in the neck, shoulders, and arms. It is also a great way to stretch the muscles in the chest and improve your posture.
- To do this pose, stand with your feet shoulder-width apart and your knees slightly bent. Raise your hands above your head and interlace your fingers.
- Bend backward from your hips, keeping your back straight.
- As you exhale, slowly raise your head and look up at your hands. Hold the pose for a few breaths, then return to standing.
- You can also do this pose with your palms facing each other. This variation helps to open up the chest even more.
13. Low Lunge (Anjaneyasana)
 RDX Sports")

Low Lunge is a great way to stretch your quads and open up your hips. It is also an exceptional way to keep your alignment right. Here’s how to do it:
- Start in Downward Dog. Step your right foot forward between your hands, then drop your left knee to the ground.
- Keep your right knee over your right ankle and sink your hips low.
- You can place your hands on your right thigh or the ground on either side of your right foot.
- To deepen the stretch, lean forward and place your forearms on the ground.
- Try extending your left leg straight behind you for a more challenging version. Hold for 3-5 breaths, then repeat on the other side.
14. Tree Pose (Vrksasana)
 RDX Sports")

It’s a classic yoga pose that’s beloved by beginners and experts alike. It’s also one of the most challenging poses, requiring a strong sense of balance and concentration. But don’t let that deter you! The tree pose is a great way to stretch your muscles and build strength. Here’s how to do it:
- Start in a standing position with your feet together.
- Lift your right foot and place it on your left thigh.
- Make sure your heel is pointing toward your groin, and your toes are pointing down. Gently press your right knee into your chest.
- Inhale and raise your arms overhead and clasp your hands together.
- Exhale and twist your torso to the right, looking over your right shoulder.
- Hold for 5-10 breaths, then repeat on the other side.
15. Downward-Facing Dog Split (Eka Pada Adho Mukha Svanasana)
 RDX Sports")

The downward-facing dog split yoga pose is a great way to stretch the hamstrings deep. It is the perfect posture to enhance balance, build core strength, and enhance mobility in the spine.
- Start in a downward-facing dog position with your hands and feet on the ground. Slowly lift your right leg up into the air, keeping your hips square. Make sure to distribute the weight on both hands evenly.
- Then, slowly lower your left leg down to the ground, coming into a split position.
- Hold the pose for a few deep breaths before slowly returning to the starting position.
- Repeat on the other side. This pose can be challenging at first, but with practice, you will be able to achieve a deeper stretch. Just remember to breathe deeply and relax into the pose.
16. Plank Pose (Phalakasana)
 RDX Sports")

Plank pose may look easy, but it’s actually a very challenging yoga pose that can provide a number of benefits for your body. When done correctly, the plank pose can help to improve your posture, strengthen your core muscles, and tone your arms and legs. The pose can also help increase your stability and focus. Here’s how to do it:
- Start in a push-up position with your hands shoulder-width apart and your feet hip-width apart.
- Keeping your core engaged, slowly lower yourself down until your elbows are bent at 90 degrees.
- Hold this position for as long as possible, focusing on keeping your body straight from head to toe.
- To release, slowly push back up to the starting position.
17. Cat-Cow Stretch (Chakravakasana)
 RDX Sports")

The Cat-Cow Stretch is a gentle way to warm up the spine, release tension in the back, and ease into deeper stretches. The Cat-Cow Stretch is also a great way to relieve stress. This stretch is named for the two main positions: cat and cow.
- To do the Cat-Cow Stretch, start on your hands and knees with your spine in a neutral position.
- As you inhale, drop your belly and tilt your tailbone up, letting your spine round into Cow Pose.
- Then, as you exhale, tuck your chin to your chest and press your palms and feet into the ground as you arch your back into Cat Pose.
- Continue moving with your breath for 10-20 breaths. You can also add variety to this stretch by adding a side bend or twist.
18. Bridge Pose (Setu Bandha Sarvangasana)
 RDX Sports")

Bridge Pose is an excellent Yoga pose for beginners. It’s a great way to release tension from the back and neck, and it also strengthens the muscles in the back, glutes, and hamstrings. Plus, it’s a great way to open up the chest and shoulders. Here’s how to do Bridge Pose:
- Begin by lying flat on your back with your feet flat on the ground and your knees bent.
- Raise your hips off the ground, keeping your thighs and feet parallel.
- Hold the pose for 30 seconds to 1 minute, then slowly lower your hips back down to the ground.
19. Cobra Pose (Bhujangasana)
 RDX Sports")
Cobra pose is one of the most popular yoga poses, and for a good reason. This posture offers a wide range of benefits, from improving flexibility to strengthening the spine.
Cobra pose gets its name from the way the body looks when performing the posture. When in position, the arms and legs resemble the hood and body of a cobra snake. In addition to looking dramatic, this pose can also help to improve flexibility in the spine and shoulders. It’s also an effective way to strengthen the muscles in the back and core.
- Start by lying on your stomach with your palms flat on the ground next to your chest.
- Slowly lift your head and chest off the ground, using your back muscles to support your weight.
- Keep your navel pulled in towards your spine, and be sure not to strain your neck by looking up too far.
- Hold the pose for 30 seconds or more, then slowly lower yourself back down to the starting position.
20. Knees, Chest, and Chin (Ashtanga Namaskara)
 RDX Sports")

Knees, Chest, and Chin is a yoga pose that offers a host of benefits. For one, it helps strengthen the core muscles, improving your posture and balance. Additionally, it helps to stretch the hamstrings and hips, which can lead to greater flexibility. And finally, it helps to calm the mind and relieve stress.
- To do the Knees, Chest, and Chin yoga pose, start in a tabletop position with your hands and knees on the ground.
- Then, lower your chest and bring your chin to your chest. At this point, your knees and chest should be touching the ground while your hips are extended upwards.
- Hold this position for five full breaths before releasing back into the tabletop position.
21. Staff Pose (Dandasana)
 RDX Sports")

In the world of yoga, there are many different kinds of seated poses. But one pose, particularly the staff pose, is a great starting point for many other seated poses. Here’s why: staff pose offers alignment guidelines that can be applied to other poses.
Plus, it helps engage the leg muscles and flex the feet. And last but not least, it can help lift the chest and relax the shoulders. Interestingly, you can also allow a gentle bend in the knees, which creates more ease for the shoulders to stack over the hips.
- To do this, sit straight on the ground with your legs extended in front of you and your feet together.
- Keep your back straight, leg muscles engaged and feet relaxed.
- Typically, this yoga pose progresses with a bend.
22. Cobbler’s Pose (Baddha Konasana)
 RDX Sports")
Cobbler’s yoga Pose is a great way to stretch your hips, glutes, and inner thighs. It also helps to build strength in your arms, shoulders, and core. If you find it difficult to balance, try placing a block under each hand for support. You can also place a blanket under your sit bones to make the pose more comfortable.
- To do Cobbler’s yoga Pose, start by sitting on the ground tall with your legs extended in front of you.
- Then, bend your knees and bring the soles of your feet together, allowing your knees to fall to the sides.
- Next, use your hands to grab hold of your ankles or toes, keeping your back straight.
- Hold this position for 30 seconds to 1 minute, and then release.
- Repeat 2-3 times.
23. Half Lord of the Fishes (Ardha Matsyendrasana)
 RDX Sports")

Half Lord of the Fishes Pose (Ardha Matsyendrasana) is a seated twist that’s perfect for beginners and experienced yogis alike. The pose gets its name from the Hindu deity Matsyendra, who is said to have been the first to teach this twist. The “half lord” part of the name comes from the Sanskrit ardha, meaning “half,” and matsya, meaning “fish.”
- To get into Half Lord of the Fishes Pose, start in a seated position with your legs extended straight in front of you.
- Bend your right knee and place your right foot on the ground next to your left hip, keeping your left leg extended.
- Place your left hand on the ground behind you and twist your body to the right, placing your right hand on the ground beside you.
- Inhale as you lengthen your spine, and exhale as you twist deeper into the pose.
- Hold for 5-10 breaths, then repeat on the other side.
Related Article: The Type of Workout You Should Be Doing If You Can’t Stay Motivated
24. Easy Pose (Sukhasana)
 RDX Sports")

Yoga is a great way to relax, rejuvenate, and refocus. But with so many different poses and styles, it can be tough to know where to start. It is a powerful move to reverse the effects of extensive hours of hair sitting. If you’re looking for an easy pose that will help you find your center, look no further than Easy Pose.
- To begin, sit on the floor with your legs crossed and your hands resting on your knees.
- Close your eyes and take a few deep breaths.
- As you breathe in and out, focus on your breath and let go of any thoughts or worries that are weighing you down.
- Once you feel centered and relaxed, open your eyes and begin to lengthen your spine.
25. Seated Forward Bend (Paschimottanasana)
 RDX Sports")

Seated Forward Bend is a basic yoga pose that can be performed by beginners and experienced yogis alike. The key to doing this pose correctly is to keep the spine straight and to focus on breathing deeply. Seated Forward Bend is a great way to release back and spine tension and can also help calm the mind. So give it a try next time you need some relaxation.
- To begin, sit on the ground with your legs extended in front of you.
- Place your hands on the ground beside your hips, then inhale and lift your chest.
- As you exhale, bend forward from the waist, lengthening the spine as you reach for your toes.
- If you can’t quite reach them, place your hands on your shins or thighs instead.
- Hold the pose for several deep breaths before slowly returning to an upright position. With practice, you’ll be able to deepen the stretch and eventually place your forehead on your knees.
Related Article: 11 Tips to Stay Motivated for Your Workout
26. Seated Wide Angle Straddle (Upavistha Konasana)
 RDX Sports")
This is an extremely effective pose to enhance your flexibility and range of motion and give your legs a deep stretch. This pose can help you unwind in the most relaxing way after a long day.
- To do this, start with a forward bend pose and spread your legs to the sides as wide as you can.
- Make sure that your kneecaps are facing the ceiling. At this point, you should feel a deep stretch in your inner thighs and hamstrings.
- Now bend forward as much as you can easily and place your hands on the floor, palms facing down. Instead of focusing on bringing your chest to the floor, focus on keeping your back flat.
- Hold the position for a couple of breaths, then return.
27. Happy Baby Pose (Ananda Balasana)
 RDX Sports")

Happy baby is one of the best ways to end a yoga session. It’s also an excellent example of the vital interplay between effort and ease in yoga. In order to properly execute happy baby, you want to exert a little pressure on your feet to draw them toward your armpits, but not so much that your tailbone lifts off the floor.
You don’t want to go to the extreme but find the middle ground. This middle ground is what yoga is all about – finding a balance between effort and ease and between body and mind.
- Lie down on your back on the mat and push your knees upwards so that they touch your chest.
- Then raise your legs upwards, bent in a way that you can easily hold your ankles or toes.
- Make sure that your shins are perpendicular to the ground and that your sacrum lies flat on the ground.
- Hold the position for 30 seconds.
28. Supine Spinal Twist (Supta Matsyendrasana)
 RDX Sports")

This pose is especially helpful if you spend a lot of time sitting at a desk or driving. The twisting motion helps to loosen up the muscles and joints in the back and spine, and deep breathing helps to reduce stress. If you have any pain in your back or neck, be sure to consult with a doctor or certified yoga instructor before doing this pose.
- Lie on your back with your legs extended on the ground.
- Keeping your shoulders flat on the mat, allow your left leg to fall over to the right side.
- Allow your body to feel a stretch in your lower back.
- Hold for 30 seconds, then repeat on the other side.
29. Child’s Pose (Balasana)
 RDX Sports")

Whether you’re tired or stressed, there’s nothing quite like a good yoga pose to help you relax. And of all the yoga poses out there, the child’s pose is one of the most popular. A child’s pose is incredibly easy to do and can be done by just about anyone. Here’s how:
- Start on all fours, with your hands and knees on the ground.
- As you exhale, slowly lower your butt towards your heels. You can keep your knees together or apart, whichever feels more comfortable.
- Once your butt is resting on your heels, extend your arms out in front of you and rest your forehead on the ground.
- Breathe deeply and hold the pose for as long as you like. To release, simply come back to all fours and press back up to a seated position.
30. Corpse Pose (Savasana)
 RDX Sports")
Corpse Pose, or Savasana, is a restorative yoga pose that provides a deep state of relaxation. The key to mastering this pose is to let go of all tension in the body and mind.
- Begin by lying flat on your back with your arms at your sides and your legs extended. Close your eyes and take a few deep breaths.
- Allow your entire body to sink into the floor and release any tension you may be holding.
- Start with your toes and work your way up to your head, letting go of all muscle tension as you go.
- Once you have released all the tension from your body, simply let go and allow yourself to drift into a state of complete relaxation.
- Stay in this pose for as long as you like, letting all thoughts and worries dissipate into the ether. When you’re ready to come out of the pose, do so slowly and mindfully, ensuring not to jar your body or disturb the sense of peace you have cultivated.
31. Hero Pose (Virasana)
 RDX Sports")
Hero pose may look simple, but it is actually an incredibly powerful yoga pose. It stretches the thighs, knees, and ankles and strengthens the arches. It can also improve digestion, bloating, and gas. The key to achieving the full benefits of the hero pose is to remain in the pose for at least five minutes.
- Kneel on the ground keeping your thighs perpendicular to the ground.
- Slightly slide your feet apart, keeping your feet flat on the floor.
- Lean your torso forward a bit and wedge your thumbs in the back of your knees.
32. Chair Pose (Utkatasana)
 RDX Sports")
It can help improve posture and core muscles while also improving balance, flexibility, and overall strength. The pose helps to open up the chest, shoulders, and hip flexors, which can all benefit from improved mobility. It can also be used as a resting pose in between more strenuous poses in order to allow for a moment of relaxation.
- Stand in Tadasana and raise your arms overhead.
- Exhale and bend your knees so that your thighs are as parallel to the ground as possible. Your knees should project over your feet, and your torso should lean slightly forward over your thighs.
- Keep your thighs parallel and shoulder blades against your back.
- Hold the pose for 30 seconds, then straighten your back.
33. Dancer Pose (Natarajasana)
 RDX Sports")

This pose may seem simple, but it’s actually quite challenging. The dancer’s yoga pose is a great way to stretch your legs and open your hips. It takes a lot of strength to lift your leg up, and it takes flexibility to reach forward and grab your ankle. But once you get the hang of it, you’ll be able to execute the move with grace and ease. So go ahead and give it a try – you might just surprise yourself!
- Start in a standing position with your feet together.
- Raise your right leg and grasp your ankle with your right hand.
- Gently pull your leg up as you lean forward, keeping your back straight.
- As you lean forward, raise your left arm straight in front of you.
- Hold the pose for a few breaths, then release and return to standing. Repeat on the other side.
34. Lotus Pose (Padmasana)
")

The Lotus Pose is a yoga position that has many benefits. It helps to improve flexibility, strength, and balance. It also helps to massage the organs, improve circulation and calm the mind. The pose can be done by anyone, regardless of their level of fitness.
- To do the Lotus Pose, start by sitting on the ground with your legs extended in front of you.
- Then, bend your right leg and place your foot on your left thigh.
- Next, bend your left leg and place your foot on your right thigh. If this is too difficult, you can place your feet on the ground in front of you.
- Once you are in position, place your hands on your knees and take a few deep breaths.
- Focus on your breath and let go of any thoughts that are running through your mind.
- Stay in the pose for as long as you like, then slowly release yourself from the position.
35. Pigeon Pose (Eka Pada Rajakapotasana)
 RDX Sports")

Let’s face it: not all of us are born with the flexibility of a professional gymnast. But that doesn’t mean we can’t enjoy the benefits of a good stretch. Pigeon Pose is a great way to loosen up your hip muscles and improve your flexibility. It may not make you a contortionist, but it will help you move more freely in your everyday life. Here’s how to do it:
- Start in a tabletop position on your hands and knees. Bring your right knee forward and place it behind your right wrist.
- Lower your left leg back, keeping your left foot flexed.
- If you’re feeling extra flexible, you can lower your chest all the way down to the floor.
- Otherwise, just let your head hang loose and focus on deep breaths.
- To exit the pose, press into your palms and lift your hips back up to tabletop position. Repeat on the other side.
36. Fish Pose (Matsyasana)
 RDX Sports")

It is a great way to open up the chest and shoulders while lengthening the spine. Fish Pose is an excellent way to combat slouching and rounded shoulders. It can also help to ease neck and upper back pain. Give it a try next time you need a little energy boost or a good stretch. Here’s how to do it:
- Begin by lying on your back with your legs extended and your arms at your sides.
- Slowly lift your head and middle back off the floor, using your hands to support your back if necessary. Bend your head backward as much as you can.
- Press your feet firmly into the floor and imagine lengthening your spine from your tailbone all the way up to the crown of your head.
- Hold for a few deep breaths, then release back down to the floor.
37. Superhero Pose (Viparita Shalabhasana)
 RDX Sports")

When you do the Superhero Pose, you are tapping into your inner power source. This pose not only feels good, but it also has some amazing benefits. For one, it helps to increase confidence and self-esteem. When you feel powerful and in control, you are more likely to take on life’s challenges with a sense of ease.
Additionally, the Superhero Pose can help to boost energy levels and promote a sense of calm. When you are feeling overwhelmed or stressed, this pose can help to center and ground you.
- Start in a push-up position and lower your body down toward the ground.
- As you lower yourself down, raise your arms and legs in the air.
- As your body takes the shape of an upward curve, you should feel a stretch in your arms and thighs.
- Hold the position for a couple of breaths then return.
38. Eagle Pose (Garudasana)
 RDX Sports")

Eagle Pose is a challenging yoga pose that requires balance and flexibility. But it’s also a very gratifying pose to master. Not only does it build strength and coordination, but it also helps to open up the chest and shoulders. And once you’ve got it down, it’s a fun pose to show off to your friends!
- To achieve this pose, start by standing up straight with your feet together.
- Then, bend your knees and bring your right leg over your left leg, wrapping it around the calf or thigh.
- Next, bring your left arm under your right arm and wrap it around the back. Finally, try to touch the tips of your fingers together.
- If you can’t quite reach it, don’t worry! The important thing is that you maintain the eagle position for at least 10 seconds.
- With practice, you’ll be able to hold the pose for longer periods of time.
39. Boat Pose (Paripurna Navasana)
 RDX Sports")

Boat Pose is a great way to build strength in your core muscles. It also helps to improve balance and flexibility. Boat Pose also has a number of benefits for the mind and spirit. It helps to increase concentration and focus, and it can also be used as a meditation tool to quiet the mind.
- Begin seated on the mat with your knees bent, and feet flat on the floor.
- Keeping your back straight, lean back slightly and lift your feet off the ground.
- Use your abdominal muscles to lift your hips off the ground and bring your torso and legs into a V-shape.
- Reach your arms forward, keeping them parallel to the ground. Hold for 5-10 breaths, then release and return to starting position.
40. Bow Pose (Dhanurasana)
 RDX Sports")

This pose benefits the spine and digestive system while also helping to open up the chest and shoulders. It’s a great way to stretch out after a long day or week. If you’re new to yoga, be sure to practice with a qualified instructor before attempting this pose on your own.
- To do a bow pose, start by lying on your stomach with your feet hip-width apart and your arms at your sides.
- Then, bend your knees and reach back to grab your ankles.
- As you exhale, lift your chest and thighs off the ground, keeping your gaze forward.
- Hold the pose for five deep breaths before releasing and returning to starting position.
Bottom Line
In conclusion, yoga is a great way to work out your body and mind. It can help to increase strength, flexibility, and confidence while also bringing about a sense of calm and inner peace. With regular practice, you’ll be able to master these poses and more! So get ready to tap into your inner superhero – it’s time to hit the mat! Namaste!


